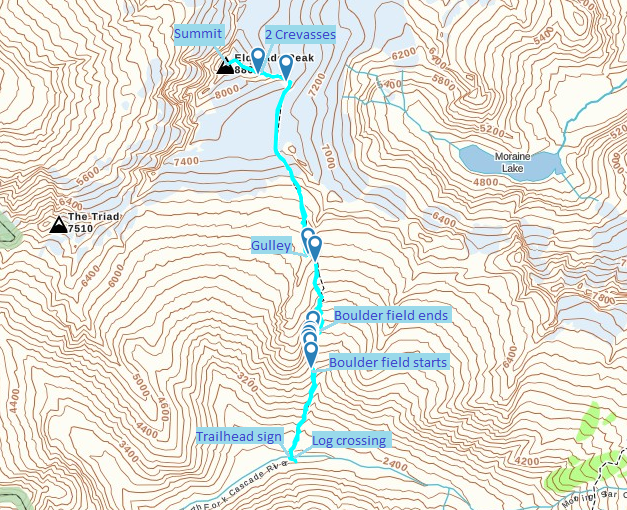
This was me and my boyfriend's first time doing Eldorado Peak and we decided to attempt a 1 day push (car-to-car) to save on weight. It took us 15.5 hours to successfully complete. We arrived on Saturday night to scout ahead for the log crossing, car camped, woke up at 3a on Sunday, and started out ascent at 4a. We encountered a lot of skiers/snowboarders.
DRIVE TO TH PARKING LOT:
- Once Cascade River Road turns to dirt/gravel, there are some deep ruts that require you to slow down and crawl over. Shouldn't be a problem unless your car is lowered. I drive a sedan and had no issues.
- We encountered a big black bear around mile 18 of Cascade River Road. It ran off into the trees on the side of the road, but just be careful not to leave food out in the parking lot.
- The parking lot is unmarked but it should be obvious. It's right before the mile 20 gate.
- The bathroom at the TH is actually super nice and clean.
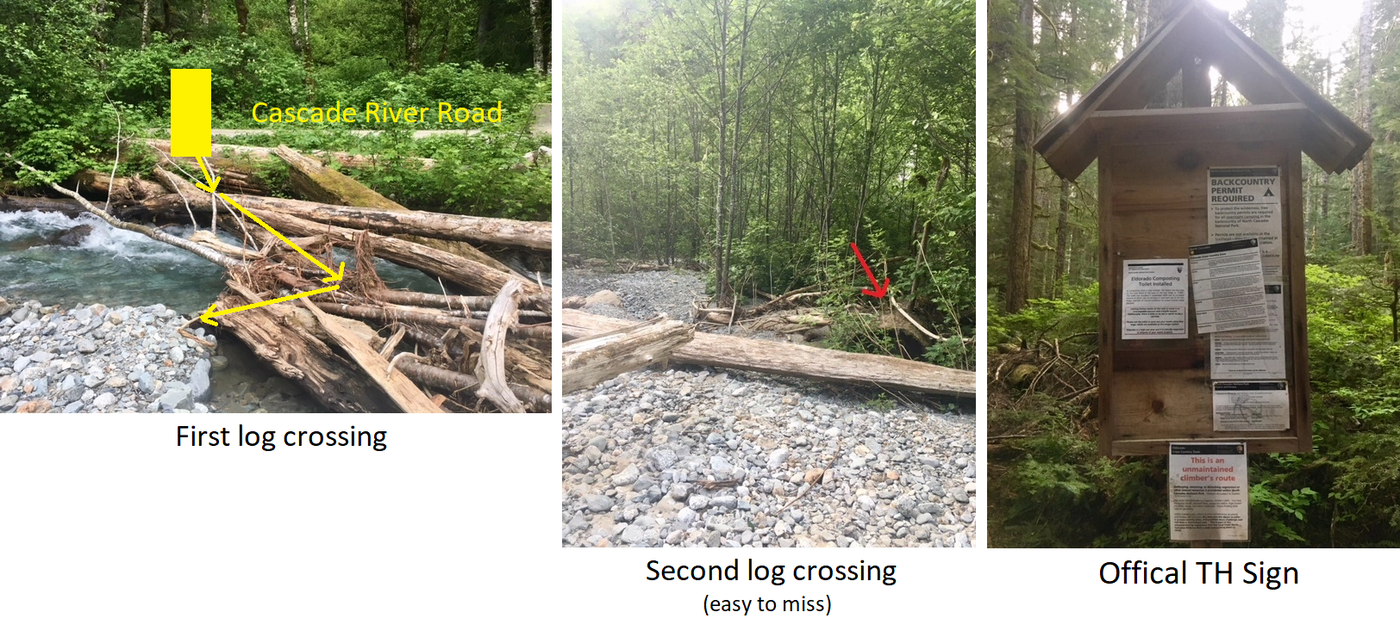
FINDING THE OFFICIAL TH SIGN (see pics):
- My advice is to scout this out ahead of time in daylight or be sure to give yourself a lot of time for trial/error. There are a lot of downed trees, but really only one direct path to the TH sign. It took us awhile to find in the daylight, but it was super easy to retrace in the dark.
- Go 200ft down the Cascade River Road from the parking lot in the direction you drove up from. There you'll see a bunch of logs stuck creating a "bridge" from the road to the river shore. This is where you need to cross. The second log is super easy to miss. It should be right in front of you once you cross the first section.
- From here just look for obvious signs of wear/tear on downed logs and you should be able to find the official TH sign. You should be aiming to continuing going straight forward. These logs are all big and wide with branches sticking out to conveniently use as hand holds if needed.
BOULDER FIELDS (2):
- Snow starts about little less than half way up both fields.
- There are lots of cairns to help guide you, but generally go up and trend to the right.
- Try to stick on the boulders for as long as you can to avoid the snow. Post holing is very real. Watch out for thin snow bridges around boulders sticking up and deep moats. Another climber told me at one point he had punched through, caught himself with his arms on the snow, and his feet were dangling below him as he couldn't touch the ground.
- We had considered bringing snowshoes for this part, but decided to leave them in the car. I think this was a good decision.
- We heard that on Saturday the black bear mother and her cubs were hanging around the middle of the boulder field area. We didn't see them on Sunday but just be aware.
GULLY:
- Warning - the gully to cross over the ridge to Roush Creek Basin/Eldorado Glacier is located around 6,150'. DO NOT FOLLOW THE OBVIOUS FOOT PATH TOO FAR UP. At some point foot path splits:
- To the left is the ridge and the gully pass - the correct way.
- To the right it continues to follow the ridge up North - this is wrong. You will have to do significant down-climb once you realize the end of it is too far up. One climber said it took him an extra 45mins to come back down to the gully spot. Another group of climbers said that this mistake cost them too much time and they ended up forfeiting their 1 day climb.
- You'll know you're in the right area if you climb up the ridge and see an old camping spot in the snow at the top.
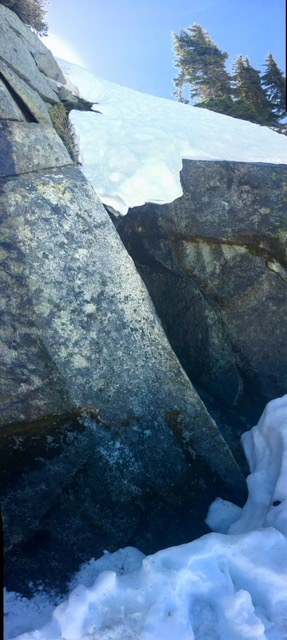
- There's a huge gap at the bottom of the gully and a big moat forming. We ended up jumping around 6' down on Roush Creek Basin from the gully as downclimbing on the slippery wet exposed rock seemed dangerous. It might be worth considering bringing 2 ropes to this climb: 1 for glacier, and 1 for the gully section. Use it to rappel down the gully and to assist with climbing back up. When it was time for us to go back this gully later in the day, we actually got super lucky. A couple had rock climbed the rock face unprotected and set up a belay at the top to lift their equipment up. They offered to belay us so that we didn't have to climb unprotected as well. We didn't end up slipping or falling during the climb, but it feel super sketchy without protection. Super grateful to them and their kindness.
ROUSH CREEK BASIN / ELDORADO GLACIER:
- After the gully, we put on our crampons, our climbing helmets, and took out our ice axes. You can follow an obvious foot path all the way up.
- We chose not to rope up as there was no crevasse danger. Just a lot of packed in snow. We did not witness any rock fall from the ridge but just be careful.
INSPIRATION GLACIER:
- You can finally see East Ridge and the peak in all its glory!! And the land finally levels out to be more flat. Continue forward to the base of East Ridge to start the final leg.
EAST RIDGE:
- There were a few camps set up here on the rocks and some skis/bags there were left behind for the summit push. We did see some folks ski all the way down from the knife edge!
- We ascended a couple hundred feet and then roped up.
- There are currently two obvious crevasses. My advice is to traverse under the first one and to the left of them. A lady told me her party traversed above and to the left of the first one and one of her legs post-holed into the crevasse that was still covered by snow! The majority of the boot path should be winding to the left - but just be careful not to go to the right of the crevasses going up.
KNIFE EDGE / SUMMIT:
- Knife edge is amazing! It's pretty exposed at the top but if you plant your crampons and ice-axe in firmly it's do-able. Just take your time if you're afraid of exposure/heights like I am.
- Prepare for an amazing 360 degree view of the North Cascades. :)


Comments